Thursday, November 29, 2012

Who is Junker Jane?

Junker Jane is a cool artist and crafter who makes one-of-a-kind dolls that are always a little more creepy than cute.  The picture below is an example of her work, and you can see more on her blog, Junker Jane.


Her dolls are shabby and stained and patched, but they are overflowing with personality, and they are always unique.

My friend Susan introduced me to Junker Jane's work, and I have grown to appreciate and love her style--so much so that Susan and I will soon be organizing a craft swap of Junker Jane-style dolls on Craftster. To prepare myself for the swap, I thought it might be a good idea to try making something Junker-Jane-style! Here's how I did it.

I started by googling "Junker Jane" and selecting "images".  That gave me about a million different pictures of her work.  I scrolled through them with a paper and pencil nearby, and sketched the details that I wanted to incorporate into my doll.  Then, using a standard 8.5 x 11" sheet of  paper, I drew an outline to use as a template for my doll.


I cut out the paper template and starting looking around my sewing room for fabrics in muted colors, when I noticed the cutter quilt to the side of my work table. Perfect!  The fabrics are already aged, AND  the patchwork section boarders a plain muslin section, which is exactly what I need for the head and body.


Here's the piece that will be the front of the doll:


I chose a few more fabrics to use for the details, and the arms and legs, and laid them out around the quilt section to see it they would work.  They will!


 For the arms and legs, I simply folded the edge of the fabric and sewed a tube with one rounded end.  One of the charming features of Junker Jane dolls is that their arms and legs are all random lengths; usually there are one or two very long limbs, and one or two very short limbs on the same doll.  Keeping that in mind, I just sewed each limb a different length!  Then I turned each tube right-side-out, and pushed a small ball of polyfill into the end.


I hand-sewed the face and body details before sewing the front to the back. The fabric on the left (below) will be the back of the doll.  I sewed front to back with the legs in place, stuffed it, and sewed the arms on by hand.  I added a bit of hair and a bow, and...


 ...Ta-da!!  Isabella is complete!


Here's the back:

I made a tiny friend for her...


...they make a happy pair.


 And I would be happy if you would join us in this craft swap!  Please consider it, if you are a member of Craftster.  If you aren't, sign up today so you will be ready when it's time for Round Two!

Tuesday, November 27, 2012

Watch This Video!!


I've gotten a bit behind in my crafting because I was busy getting ready for Thanksgiving, so it will be a few more days before I have anything new of mine to share.  But I do have something to show you:  an amazing two minute video of a 500 member flash mob, all wearing sweaters knitted by a single woman (she's the lady sitting on the throne in the video).  If you need a quick "lift" today, do yourself a favor and watch this video! 

Friday, November 23, 2012

Another Tree

This is the third and final tree-themed holiday ornament I sent to my partner in the recent Ho Ho Ho Craft Swap on Craftster.  It's a fabric collage that can be used as either an ornament for the tree, or as a wall hanging.  It is small, only about 4" x 5", with a strip of suede for hanging.


I still have a few "tree" ideas floating around in my imagination, so I will try to bring some of them to life in the coming weeks.  When we put up our Christmas tree next weekend I'm sure I will want to do some more holiday crafting!

Monday, November 19, 2012

Hearts: Mission Accomplished!

I've done it!  I've finished all the hearts for The Giving Heart's charity Christmas tree! 


Here are all 134 of my hand-made hearts!  Plus, my lovely reader Kay made and sent 10 hearts directly to the charity for a total of 144.  (Kay, I just heard from the director of The Giving Heart, and she is so thrilled to have received your package of hearts "all the way from England"!)


I just have to share a couple of gratuitous cat pictures with you...


Juniper has become quite a camera-hog after helping me choose the winner of  the recent surprise giveaway...

Anyhoo, the hearts filled up a large box...


...and I will be taking it to the post office momentarily!  The tree will be decorated and displayed all during December, along with trees from other charities in Richmond, Virginia.


This was a wonderful, fun project, and it couldn't have been more perfectly suited for me (because I love making hearts so much!) Thanks to all of you who offered compliments and words of encouragement along the way.


Saturday, November 17, 2012

Simple Tree, Fun Photo

In my last post, I told you about the "Ho Ho Ho" holiday craft swap on Craftster.  In addition to the tree-themed centerpiece I made for my partner, I also made two small items, and one of them is a Christmas tree ornament, made from wool felt, inspired by one that was on my partner's Pinterest.

The tree is simply a stack of felt circles, with a roll of brown felt at the bottom for the trunk, and a gold star at the top.


All the circles started out the same size, and I trimmed them individually to they would form a nice tree shape. (That part took a long time!) Then, using heavy thread and a loooong needle designed for sewing dolls, I stacked the circles.  To give the tree more stability, I also added a little glue between the layers.

Then I took this picture, below.

It's boring.

So I went to a picture editing site I just heard about, pixlr-o-matic...


...and I turned it into this!  Now THAT'S what I call a fun picture!


Pixlr-o-matic is really easy to use--I love things that are uncomplicated and intuitive (because I HATE to read directions!)--and I highly recommend it. You upload a picture, choose your lighting, special effect, and boarder, and you are done!  I had a blast trying out all the different options, so I can see that many of my photos will be more interesting in the future. You should try it!

Thursday, November 15, 2012

Winter Trees

With Christmas less than six weeks away, my thoughts have turned to holiday crafting...and I've gotten a head start by participating in the "Ho Ho Ho" craft swap on Craftster.  For this swap we were to make one large item and two smalls, based one one of our partner's three themes.  I chose to go with alwaysinmyroom's theme of "trees" (her other themes were "birds"--which was tempting--and "elves", which wasn't speaking to me...)

She said that one thing she would really like is some sort of centerpiece for her table, with room in the middle for a candle.  Here's what I came up with:


It took a lot of thinking to figure out how I was going to make this!  I finally realized the best base would be a 10" wooden embroidery hoop (just the inner piece), with wooden spools glued to it, and dowels for the tree trunks. (I sharpened each dowel in the pencil sharpener to get them to fit into the spools!)


I have a LOT of wool felt, so I was able to use a nice variety of greens for the trees. I drew four different tree shapes, and simply cut out the paper drawings to use as my templates.


I sewed beads or buttons onto both pieces of each tree, then hand-stitched them together, leaving an opening at the bottom for stuffing.


After painting the hoop and spools white, I glued them together, and glued the dowels in place. When everything was dry, I slipped a tree onto each dowel and secured them with glue too.

Don't you think these trees, individually, would make great Christmas ornaments?  If you used red or white felt, they would really pop against the green of a Christmas tree!


I love this winter wonderland!  I hope my partner does too (she should be receiving it today!!)


Monday, November 12, 2012

Greeting Cards from UFO's

If you are a crafty person like me, you have numerous UFO's lying around your work space. I'm not talking about flying saucers!  I'm referring to the "unfinished objects"--the bits you cast aside on your way to making a masterpiece of fabric or paper or paint or something else.  You save them for the same reason I do:  because they are too good to throw away, but they don't have a real purpose.

Yesterday, when I needed three special greeting cards to send to members of a friend's family (who were all involved in a car accident and are in the hospital),  I came up with the brilliant idea of turning UFO's into cards for them.

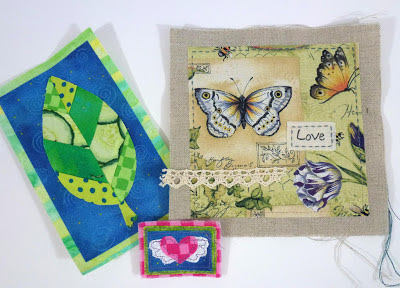
Here are the UFO's I started with.


You may remember this one, below--it's the Chevron Leaf Patch which I used on a journal cover.  Since I was making it for my blog swap with Lime Riot it HAD to be my best work, so to be safe, I made two leaf patches.  This extra one had Heat n Bond already applied to the back, so I turned it into a card by simply ironing it onto card stock!  It worked well and was extremely easy.  Since the leaf was already framed with the green fabric, I didn't add anything extra to the card at all. The finished size of the card is 6 1/4" x 4 1/2".  I will send this one to my friend's father.


Next, I found this tiny 1 1/2" x 2" winged heart patch that was the prototype for the altered matchboxes I made for an art abandonment project.  (The funny thing is that the final matchbox art looks completely different from this prototype!  That's creativity for you!)  I cut card stock to 5 1/4" x 3 1/2" (to fit into a small envelope I had on hand) and then added scrapbook papers to frame the UFO, which I glued on top.  I will send this card to my friend's sister.


I was so excited when I came across this embellished fabric square, below.  It was originally going to be a pin cushion, but before I got very far with it I learned that the intended recipient hated the color green!  I made something non-green for her instead, and tossed this into a drawer.  It's the largest piece of the three:  the patch measures 4 3/4" square, and it is composed of a single piece of nature-print fabric backed with linen and embellished with buttons, lace, embroidery, and a little patch on which I wrote "Love" .  To turn it into a card, I simply glued dark gray scrapbook paper to card stock to frame it, and glued the patch on top. The finished card measures 8 1/2" x 5 1/2", and it will go to my friend's mother.


So the next time you need a greeting card, why not try making one from the odds and ends left over from other projects?  I know it will be fantastic, and so much more interesting and meaningful that something bought from the store.