Pages

Sunday, October 30, 2011

More Journal Covers

In September, I posted a Journal Cover Tutorial for a swap I was organizing on Craftster.  The swap is winding down now, which means the gallery is filling up with some really great and inspiring journal covers!  You can see them all if you click here.

For my partner who loves "Hello Kitty", I made this journal cover:

The great thing is, my daughter is also a Hello Kitty fan, so I already had this fabric in my stash!  Using wool felt, black embroidery thread, and Heat n Bond, I made the large kitty-face applique for the front.  Hello Kitty always wears a bow in her hair, so I sewed a 3-D bow onto her head.  It will probably become flattened with use, but I don't think it will detract from it too much.  I also added a ribbon bookmark with a flower charm.

My other partner is an art student who loves bright colors.  I was inspired by the cover of this magazine


to create this journal cover


I gathered up all my bright-colored scraps and ironed on a lot of Heat n Bond!  Then I made a leaf-shaped template and cut out all the fabrics.  I printed the words on the computer, and traced them onto the fabric using a light box.  After the leaves and the oval with the words were ironed in place, I thought it still needed something, so I embroidered around the oval with bright blue thread...and it STILL needed something.  I always have buttons handy, and they seemed to fit well above the oval to balance the design.  This one also has a ribbon bookmark.  I am thrilled with how it turned out!

See the white cover with fruit on it, underneith the orange one?  I use that journal EVERY DAY, to plan my day, make to-do lists, and write down random thoughts.  I love how pretty it is; it's so much better than using a plain composition book.  So, if you didn't get one in our swap, I strongly recommend that you make one for yourself!

Saturday, October 29, 2011

My First Mug Rug

Recently I was in the Mug Rug swap at Craftster, and I made my very first one!  A mug rug is bigger than a coaster and smaller than a placemat; the idea is that it is big enough for a drink and a snack.  It is really just a little quilt, so as a life-long quilter, I jumped right in!

I looked through my partner's Wists and I saw this picture:
I decided to use that as my inspiration.  I drew up a pattern, cut out the pieces, and hand-appliqued the fruit onto the background--that took a few hours.  Since her favorite color is yellow, I used that and red as the main colors. 

For the back I drew a message, using a sloth (also taken from her Wists) and a heart to represent our Craftster usernames.  I love the yellow dot fabric on the back!
When I was finished, I knew I had done my best work--but was it appropriate for something that would quickly be subjected to coffee stains and cookie crumbs?  Hmmm, not really!  Luckily, my partner, who is also a quilter, realized this too, and said that she plans to hang it on the wall in her kitchen.  Yay!

This experience served to remind me of something I already knew:  you need to take into consideration the function of the item you are making when you decide on the techniques you will use.  Fine hand-applique should be reserved for things that won't receive a lot of wear and tear.  Next time, I'm using Heat n Bond!

Friday, October 28, 2011

The Post Office Loves Me

When I posted the tutorial for my scrappy patchwork technique, which included a scrap fabric giveaway, I expected to get a few requests for scraps from Craftster members, and that's just what happened the first couple of days.  Then yesterday, my Scrappy Snappy Pouches tutorial (which again included a scrap giveaway) appeared on CraftGossip.com--and now I'm almost afraid to read my e-mail because I've been flooded with requests for scraps!

I went to the post office again today, to send fabric-scrap-filled envelopes throughout the U.S. and Canada.  So far I've mailed 32 envelopes, so if you requested scraps before 10am EST today, your envelope is heading your way right now!  Here's my mail bag:


One of the envelopes in the bag actually contains a scrap of the chicken print fabric left over from making this bag (several years ago)!  Who will get it?

Ironically, after mailing away so many scraps, it actually seems that I have MORE scraps now than when I started!  It's as if every time I put one in an envelope, two more sneak into the pile!  Where are they coming from?  Take a look:
Sadly, this is how my living room looks right now, so if you haven't requested your scraps yet, don't worry, I've still got some!

Thursday, October 27, 2011

How to Set a Snap Without Crying

This snap-setting gizmo might make you cry.  It's hard to use and you frequently end up with a snap that's only half-way on, and you have to pry it off the fabric, which oftens means you damage the item to which you are applying the snap.  I hate that!  It makes me so mad!!

 Following the directions on this package could also lead to tears.  They tell you to hammer the snaps, without offering a way to keep the plastic on the front of the snap from cracking under the hammer blows.


After applying many snaps, and suffering through many failures, I came up with my own way to set snaps like these.

 Here's what you will need:  the four pieces of the snap, two thread spools, a piece of scrap fabric, a hammer and a pencil.  (Oh--and an item in need of a snap!)

Start with the front of the snap.  Find the spot where you want it to be, and push it into the fabric.  Since you are probably pushing it through several layers, the prongs will barely be showing on the back.  Use the pencil eraser to push the fabric down onto the prongs, so the ends of the prongs are well-exposed.  (See how chewed-up my eraser looks?  It has helped me with a lot of snaps!)

To fasten the "outie" part of the snap, start by placing your scrap fabric on top of one of your thread spools; this will cushion the snap.  The center of the spool has a round hole; center the snap over the hole (you will have to feel around for it, since the scrap of fabric is covering the hole).  The hole will cradle the snap and provide even support around the edge, so when you hammer it, it won't crack.

Center the "outie" part of the snap on the exposed prongs.

Now center your second thread spool over the "outie".  Hold the spool firmly with one hand, and whack the spool with the hammer four or five times.  Remove the spool and check the snap; if it doesn't seem tightly attached, you didn't hammer hard enough.  Replace the snap and spool, and hammer it harder!  (I usually warn other people in the house before I start hammering!)

I don't have a picture for the other half of the snap, but it's the easy part, so I will just tell you:  mark the spot on the fabric where you want the other half of the snap to go.  Push the "prong" piece up through the fabric from the bottom at your mark, again using the pencil eraser to push the fabric down and expose the prongs.  Center the last piece of the snap on the prongs (but check to make sure the deeply-grooved side is FACING DOWN; otherwise it won't hold).  You only need one spool this time, because all the hammering in the world won't hurt this half of the snap!  Just put the fabric item on the workspace, center a thread spool over the snap, and whack it hard with the hammer four or five times.

Hooray, you did it without breaking the snap OR crying!

ANOTHER Special Order

A few weeks ago I told you about a special order I received for a purse--I said that my purses usually look something like this:

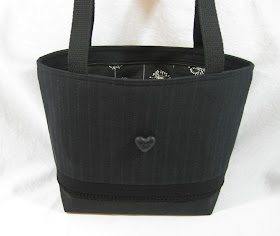
but the bag she wanted would be all black, and it came out like this:

She liked that black bag so much, she has ordered another purse--all brown this time--and it looks like this:


Not bad, right?  I think I'm getting the hang of this!  Solid-colored bags actually look okay!

Tuesday, October 25, 2011

Scrappy Snappy Pouch Tutorial

After posting the tutorial for scrappy patchwork, my friend Susan (aka The Sloppy Sewer) tested it out and had some questions.  Since another reader asked for a pattern for the red snap pouch, I've decided to present you with another tutorial, with a more detailed explanation of the scrappy patchwork technique, AND directions for the pouch (this time in pink).  What more could you ask for??  Here we go!

Scrappy Snappy Pouch Tutorial

Here's what I will make today:

You will need to make a template for your pouch.  I use template plastic, like that in the picture below, because it is sturdy, has handy grid lines, and you can lay it over your fabric to check pattern placement.  You can buy this at most fabric stores.  If you want to use cardboard, that will work too.

Cut a piece of your template material 5 1/2" by 6 1/2".  To make the curve at the top, find something circular--I am using a plate with a diameter of 8 1/2".

Find the center of your template material on one of the shorter sides.  The arrow marks the center of mine. Line up the edge of your plate (or whatever you are using) with the arrow, and trace the curve.  Cut it out on the line and you have your template, which INCLUDES SEAM ALLOWANCE. (I will move the plate right up to the top of the arrow to mark my curve.)

Now, on to the patchwork!

1.  Start with scraps that are not too big: not more than 2-3" wide, not more than 10-12" long.  Here you can see that some of my pieces were bigger than that, so I cut them up before sewing.  Notice that I cut them at random angles.  You want to avoid 90 degree angles to make it look scrappy.

2.  Start sewing pieces together.  Sew two pieces together, then iron, then cut a new straight edge along one side, at a funky angle--this straight edge is where you will sew another piece of sewn-together scraps.  The section in the center of this picture is what I am starting with.  I sewed together the striped and dragonfly pieces, then ironed, cut a straight edge, and sewed on the flower piece.

Here's the same segment, after I've cut the edges straight.  Since this is the one I'm starting with, I cut all the edges, so I have lots of areas to choose from to sew on the next piece.  After this I will just cut one side at a time; I will choose the piece to sew on based on the size of the piece and color/pattern placement.


Here I've added another section of pieced-together scraps, ironed the seam flat, and now I'm cutting a straight edge. YES, you will end up cutting off a lot of fabric to make the edges straight!  That's okay--it means you're doing it right! (I know it's ironic that you will generate a lot of scraps while using your scraps to make this scrappy fabric! Don't worry about it!  Sometimes those pieces can be sewn to a different side later.)

 3.  As the pieced fabric gets bigger, use your template to check it from time to time.  This will help you decide which area to use for the front of your pouch, and where to sew on more fabric.  I need to do some more sewing!

(You can use narrower seams than usual when piecing together your scraps; one-eighth of an inch is not too narrow, if you can manage it, and it will reduce the bulk on the back of your fabric.)

4.  Okay, now my fabric is big enough to make the pouch. The template includes the seam allowance, so just trace around it with pencil, and cut on the pencil line.

5.  You will need two more fabrics: 
--pouch bottom-front, cut 5 1/2" x 3 3/4"
--pouch lining, cut 6" x 10 1/2" (I like to cut my lining a little bigger to avoid disaster when sewing!)

Sew the bottom-front fabric to the patchwork fabric, right sides together, on the shorter straight edge.

6.  Iron on some fusible interfacing to give the fabric body.  I use Pellon featherweight fusible.  I am also going to use sew-in interfacing (again, I use Pellon, any weight will do--I used a scrap I had laying around).  Here, my inner and outer fabrics have interfacing ironed onto the back; in the middle is the sew-in interfacing.

7.  Layer everything like this:
--sew-in interfacing on the bottom
--lining fabric, face up, in the middle
--patchwork fabric, face down, on top

Pin together, and sew a 1/4" seam around the perimeter, leaving a 2" opening on one side (in the picture I'm pointing to the best place for the opening).

8.  Trim your seams down to 1/4"; turn right-side out through the opening, and iron flat.  Then fold up the bottom-front section (the solid pink section) and iron a good crease there.  You can see the crease in the picture.

9.  Sew the pouch together with a single line of stitching, starting at the bottom front corner, sewing up the side, around the curve, and down the other side to the other bottom front corner (don't stitch along the bottom edge).  Back stitch at the beginning and ending of sewing.

10.  Iron the front curved section down, add a snap, and you are done!


Which one do you like best?


I'm still offering an envelope of scrap fabric!  Just do two little things:

1.   Leave a comment below, it can be about anything.
2.   Click on my name at right to find the link to my e-mail.  Send me an e-mail with your mailing address, color choice for scraps, and Craftster username (if you are active on Craftster ).

I will send you some scraps ASAP, to get you started on your own scrappy project! (That's right--this is a free offer!)

Saturday, October 22, 2011

Scraps: I Have a Few

Yeah, I have a few scraps...a few MILLION!  Here they are! After yesterday's post about the Scrap Happy Swap on Craftster, I decided to gather them all together to see exactly what I had.  From the back of the closet and the top shelf above the washing machine, from under my sewing table and behind my sewing chair, I gathered together all my bags and boxes of scrap fabric.

I want to give them away!  Soon after yesterday's post was published, announcing the scrap giveaway, I got my first request...and my only request.  So I thought I would show you what you could expect to receive if you request a packet too--they are good scraps!  Not tiny bits, but mostly big strips that you can really use. This picture shows the scraps next to the business-size envelope they will arrive in:

And just to show how useful they are, I made this cute little pouch from them!  The front flap and back are all scraps; the lower front and lining are single larger pieces:


Here's something else you could make with these scraps:  a patchwork fabric bracelet. 

 So leave a comment here, or under yesterday's post, and then click on my name at right to access my e-mail on my profile page.  If you e-mail me your name, mailing address, and color choice, I will send you an envelope of scraps to get you started on your own scrappy patchwork project.  I'm looking forward to hearing from LOTS of readers!!  C'mon, what are you waiting for??

Friday, October 21, 2011

Scrappy Patchwork Tutorial and GIVEAWAY

Okay, time for another swap-related tutorial!  This time I will show you how to make a scrappy patchwork card case, but this patchwork technique could be applied to any sewn item.  Basically, you are just making a large piece of patchwork fabric, from which you will cut a piece to make your card case (or potholder, or pillow, or pouch...)  There is a giveaway at the end of this tutorial, so read (or at least scroll through) the whole thing!  And, if you love "scrappy" stuff and want more, more, more, join us on Craftster for the Scrap Happy Swap that my friend Susan (The Sloppy Sewer) and I will be starting within the next week or so.  You will be able to choose whatever you want to make for the swap; I'm offering this tutorial to show one way to make something "scrappy".

Card Case Wallet Tutorial

1.  Go to your scrap bag and choose some scraps.  I have a lot of blue, so that's what I'm using.  I chose similar shades of blue, with a few pops of color thrown in.  Iron your scraps. (A couple of mine were already sewn together from other projects--bonus!)

2. Start by sewing the scraps together in pairs, and iron flat. 

3. Using a rotary cutter and clear ruler, cut the sewn pairs into smaller pieces (3-6" long), but be sure not to cut at 90-degree angles!  You want as many different angles as possible to make it look random.

Here are my pieces all cut up:

4. Start sewing the cut-up pieces together in pairs.

You will need to straighten all the edges, so trim as needed.  I'm using this one as my center:

Other pieces ready to sew to my center:

You will sew scrappy units together, ironing and trimming after each one, to build up a piece of scrappy fabric large enough for the item you want to sew.  For the card case, we need a piece at least 9" x 4 3/4"

Here is my finished scrappy fabric.

5.  You will need iron-on interfacing; light-weight Pellon is what I use:

You will also need a backing fabric for the card case.  I'm using plain blue fabric, cut larger than 9" x 4 3/4".
Cut pieces of Pellon to fit both fabrics, and iron it on now.

6.  Cut your patchwork fabric to the size needed for the card case:  9" x 4 3/4"

Leave your backing fabric larger.

7.  This is my interfaced patchwork fabric face-down on the backing fabric.  Sew all around the edge of the patchwork fabric, using a 1/4" seam, and leave a 3" gap unsewn for turning.

8.  Trim the excess backing fabric and turn the case right-side out.  Press.  To make the card case, you will need to fold the short sides in 1 1/2"--I have marked mine with pins.  Fold in and iron.

...but before I sew the flaps, I think I will add an elastic loop so I can close my card case with a button. I'm using a hair elastic.  Tape it about 1/3 from the bottom, and cut it off.  I'm going to cover the raw end of the elastic with a piece of scrap fabric.

I ironed Heat n Bond Lite to the back of my scrap piece so I could iron it in place over the elastic before I sew.  If you want a scrappier look, skip the Heat n Bond.

Sewing the elastic and patch in place. 

9.  Okay, NOW I'm ready to sew the flaps.  Fold the short sides in on the crease you have already ironed.  Top stitch very close to the edge, not more than 1/8".  Go from one end to the other, then sew the other side.  Be sure to backstitch and the beginning and end of each seam.

Sew on a button and fill with cards!


 Okay, here's the giveaway I mentioned:

Because I LOVE loyal readers, I will send you an envelope of scrap fabrics to get you started on your own scrappy patchwork!  Just do two little things:
1.  Post a comment below.  It can be about anything.
2.  Send me an e-mail (click on my name near my picture...there is an e-mail link on my profile page)--I will need you to send me your mailing address and color preference for your scraps (and Craftster username, if you are active on Craftster, so I will know you when I see you!)

Thanks so much for reading this!  I hope we get lots of you in the Scrap Happy Swap on Craftster!