Showing posts with label sewn. Show all posts

Sunday, August 5, 2012

MORE Scissors Fobs

You probably know that I'm working on a challenge on my other blog (365 Sewn Hearts) to make 365 sewn hearts this year.  I want to share a small milestone that I reached this week:  I've filled up a second pint-sized canning jar with heart-shaped wool felt scissors fobs.  The timing is perfect, because my enthusiasm for these fob-hearts has decidedly waned!  It's funny, because for 2 months I've been a fob-making machine, full of excitement and new ideas; but now I am very ready to move on to something completely different.  There are still over 100 days left in my challenge, and I have a good idea that will carry me through a large chunk of that time--if you check my heart blog in about a week, you will see what that idea is!

The two jars full of fobs:


Here they are, all nicely arranged!


You can see how small they are in the picture below, with one resting on my fingertips.  Each heart is about 1 3/8" in each direction.


The two below aren't in the group picture because I gave them away in personal swaps this month, with people on Craftster.

The snowman went to Homerof2.  (She is in Canada, and I also sent her a Canadian flag fob; the one in the picture above was the "reject" because I felt that the maple leaf was too tall and skinny!)


This beauty of a chicken now lives with waggonswest


I love looking at all of these hearts; and I expect I will make a few more before the year is out, when I get some new ideas for them.

Wednesday, August 1, 2012

Two Prayer Flags

I have recently discovered that I LOVE doing fabric collages!  Here are two examples of my recent work in that style, which I made for my partners in the Prayer Flag Swap on Craftster.  Both of these flags are 5" x 8", with a hanging sleeve at the top.

For this swap, we gave our partners several words or phrases to either use as a guide or to actually appear on our flag.  We also mentioned themes and images that appeal to us.  For my first partner, alteredmommy, I combined the phrase "be still" will her love of nature/birds and antique-looking colors.


The egg and the words "crested lark" were printed on fabric that I already had, so I chose the other fabrics to go with that.


I love this little "pile" of textiles.


I filled a glass bottle with lavender buds and the theme phrase printed on a slip of paper, and hand-sewed it in place.  (You might notice that this bottle is different than the one in the first picture.  I realized that the bright green beads I used inside that bottle didn't go with the rest of the colors.)


All the fabric edges are left unfinished, and most of the sewing threads are long and dangling.


My second partner, Phizzychick, likes earth tones and insects, so I started digging through one of my bags of scrap fabrics, and almost immediately I pulled out this fabulous bee!  I had to use it, even though there isn't much of a connection between the bee and the word "thankful" that I already planned to use for the theme.


I found out that this partner also likes bells, and I happened to have these tiny ones on hand.  I simply tied them onto the bottom with string, leaving the ends of the strings showing.


I made this flag like the first one, by simply cutting the fabrics, arranging them so they looked good to me, then machine sewing them onto a heavy piece of canvas.  All the edges are left unfinished.


 Leaving all the edges raw allowed me to work quickly, so it didn't take more than a couple of hours from start to finish for each prayer flag.


I am so pleased with these that I feel like making a set of them for myself!

Saturday, July 28, 2012

Meet Bonnie Blythe

I'm excited about something new--it's a doll named Blythe.

I first noticed Blythe dolls on the swaps board on Craftster;  the doll owners were making and swapping clothes and accessories for their Blythes.  The clothes were really CUTE, and the accessories were FUN, and I wanted to make some too!  But first I needed a doll.

Takara, the company that makes Blythe, is in Japan, and they don't distribute the dolls in the U.S.  There is only one reliable Japanese store that sells them online--Junie Moon--but the prices there are pretty high.  The best place for me to get my doll was eBay.  I started watching all the Blythe listings obsessively, and reading all I could about collecting Blythe.  It turns out that there are a lot of fake Blythes on the market (made from inferior materials), so you have to be careful who you buy from.  Within a few days I saw the particular doll I wanted--"Raspberry Sorbet"--offered by a good seller in Hong Kong; and I didn't even have to play the bidding game, since she was offered as a "Buy it Now" purchase.

While waiting impatiently for her arrival, I continued reading about Blythe collecting.  There are Blythe blogs and online Blythe forums, and there is even a big Blythe convention taking place in Texas in August:  Blythecon 2012!  (Maybe I'll go next year?!) 
I also decided on a name for the doll:  Bonnie. 

Earlier this week, the mailman rang my doorbell, and I had to sign for the package.  I expected it to take two weeks or more, but she got here in about a week--wow!  The box was wrapped in brown paper and tied with a string, and it was strangely pristine--I've gotten local packages that look like they've been on a long sea voyage, but this didn't have a mark, dent or crease!  Removing the brown paper revealed a plain brown corrugated cardboard box, and inside that was the prize:


And here she is (below), right out of the box and wearing her full ensemble.

I love the hat, coat and boots she came with; but the shirt and shorts she's wearing needed to be ditched fast.  Time to sew an outfit--yay! 


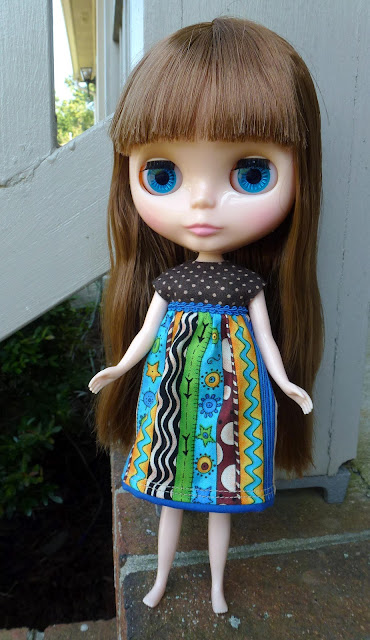
There are a ton of sewing patterns for Blythe online, most notably at Puchi Collective. That's where I found the pattern for this empire waist dress (below).  This is the first time I've sewn doll clothes since I had a Barbie as a pre-teen!  I chose these fabric colors to compliment Bonnie's hair and eyes.  Did I mention that Blythe dolls have changeable eye colors?  They do!  Each doll has four different sets of eyes, and they change when you pull a string on the back of her head.  I'll get busy sewing something to go with each color to show you in the coming weeks.

You might have noticed that her head is "slightly" large in proportion to her body.  All the more reason to make cute hair accessories for her!  I'm dying to make some pretty headbands and fascinators.  She also needs a bed... and a chair...and a table...and a house... and a...

If anyone reading this is a Blythe owner, I'd love to hear about your girl!  Leave a comment below or send me an email (leslieandersen4@gmail.com).

Friday, July 20, 2012

Berry Bag

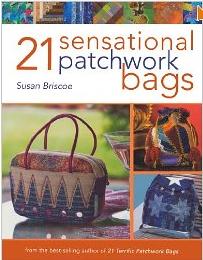
I made a cute little berry bag for a partner in a recent craft swap on Craftster.  She had it on her Wist, and she mentioned it as a big wish in another swap, but it didn't appear that she had received one yet, probably because the pattern isn't available online.  A little research led me to the pattern in this book:


...and because I was in a hurry and didn't want to wait for it to come in the mail, I decided to download "21 Sensational Patchwork Bags" to my iPad.  I wondered how I would copy the patterns, but I threw caution to the wind and went ahead and bought the download.

Just as I suspected, buying the e-version of a pattern book wasn't that great.  I ended up enlarging the patterns (to the size I though was right) on the screen, then placing paper on my iPad and tracing them.  The bag is made of two differnt petal-shaped pieces (one for the berry and one for the leaves), and I was surprised that the "test" bag I made came together perfectly!  The only problem was, I added interfacing (I seem to be addicted to interfacing!) and the bag was too stiff to close properly, so I removed the drawstrings and now I'm using is as a threadcatcher in my sewing area.  I love my "reject" bag!

The berry bag in the book is made of patchwork, but my partner had "Wisted" some that were made in batiks, so I used these beautiful batik fabrics for hers.


Making the little balls for the ends of the cords was trickier than I expected it to be.  It took a LOT of stitching around the tops to get the shape just right.


The bag is really small, about 4" wide and tall.


I used the same fabric for the lining as for the outside, but it would be pretty with a different fabric inside.

My partner loves her berry bag!

Going back to the book for a moment--I highly recommend "21 Sensational Patchwork Bags" if you have any interest in patchwork or bags.  There is a lot of information, and a lot of interesting bags in all sizes and styles.  Just do yourself a favor and buy the PAPER version!

Wednesday, July 18, 2012

My First Prayer Flag

My friend Susan and I have started a new swap on Craftster called the Prayer Flag Swap.  There was a recent article about prayer flags in the magazine Cloth Paper Scissors that we are using for our guide. 

There is a cool blog called The Prayer Flag Project  that is dedicated to these flags if you want to read more on the topic. The original idea is that the prayer flag is a small banner to be hung outdoors, that slowly deteriorates and releases your prayer into the world. With that in mind, you can see that it is not expected to be a masterpiece of perfect stitching. Rather, it is an art piece that is thoughtfully and prayerfully made.

One of the participants in the swap happens to be my partner in another swap, and she suggested that we also exchange prayer flags.  I liked the idea because it would give me a chance to practice before the actual prayer flag swap started!  I decided to make it collage-style, with all the edges left unfinished.  Since my partner has a picture of a field of lavender for her avatar on Craftster, I used that as my inspiration as I gathered fabrics from my stash, and started cutting.  Here is an in-progress shot, before anything was sewn together:


We exchanged some possible words to use on our flags, so I used rubber stamps to write "prosperity".

I used machine-sewing to anchor all the fabric, and then I sewed on buttons and coins by hand.  I am extremely pleased with this first prayer flag!  I love the freedom of cutting and sewing without worrying about finishing the edges.  After this one I made two more, which are currently in transit to my swap partners.  I will show them to you next week.


 If you would like to make a prayer flag yourself, here are the simple instructions:


How to Make Prayer Flags
1. Cut pieces of fabric to 5" x 11". Use materials you already have on hand.

2. Fold the top down on each piece of fabric and stitch in place to create a 3" sleeve, making the flag surface 5" x 8".

3. Paint, stitch, embroider, appliqué, or collage the flags.

4. Add words, journaling, or symbols as desired. You can appliqué letters, add hand stitching, stencil with textile paint, or just write with a permanent marker.

5. Thread the flags onto a string or cord and hang them outdoors so the breeze will catch them and spread your intentions.

It's all up to you as to what surface designs or stitch techniques you want to use on your flag.

Saturday, July 7, 2012

Another Spoonflower Bag

After I made the Pug Dog Purse for my sister-in-law, her friend saw it and wanted one too!  The friend's favorite dog is a miniature schnauzer...which is perhaps not the most widely known dog breed...and I suspected that it would be hard to find fabric with miniature schnauzers prominently featured...and I was right.  So I returned to Spoonflower, where a wonderful designer called Dogdaze had created just exactly the right fabric for this project.  I had to purchase a yard of it because of the placement of the design...so I have extra in case any of you would like a miniature schnauzer bag...anyway, the purse came out so beautifully, I am THRILLED with it!


I just adore the combination of aqua and black. 


I even had the perfect lining fabric in my stash!

I sent this purse to it's new home just before the July 4th holiday, so I haven't heard from the owner yet, but I can't imagine that she will be anything but pleased with it. 

Thursday, June 28, 2012

Two More Felt Badges

I really love working with wool felt!

I am currently in the second round of the Felt Badge Swap on Craftster.  This time we are making and sending two felt badges to our partner.  These are the badges I sent to farmerswife in England.

First, a hen, because she really IS a farmer's wife, and she is lucky enough to have chickens!  (I am so jealous of her!  It's a running joke here at my house that I wish I could have chickens...I just think they are super cute.)


 I made a paper template for the shape of the hen, then I cut all the smaller pieces of felt free-hand. I love the folk-art feel of this hen; I might have to make another one like it for myself!


Second, a "lurking" owl (that's what he's been called in the swap gallery--and I guess I can see why!)  Farmerswife has a few owl-themed things in her Pinterest, so when I saw a card with this design I knew it would be great as a felt badge.


This one was a fun challenge, with the "wood" overylay.  As with the hen, I started with a paper template for the opening in the tree and the owl, then cut the smaller pieces free-hand.


Each of these felt badges is approximately 2" x 3".  Farmerswife has received them and she loves them.  I can't wait to get mine from her!

Sunday, June 17, 2012

Happy Father's Day!

Here's wishing a happy day to all the wonderful fathers in all of our lives--especially to my husband, Bill!


I made a simple drawstring dice bag for my husband, based on my pattern for the drawstring backpack.


I used two outer pieces and two lining pieces, all cut 10" tall by 7" wide.  The assembly was exactly the same as the drawstring backpack, except that I omitted the grommets at the bottom.

Tuesday, February 14, 2012

Valentine's Day


HAPPY VALENTINE'S DAY!!

Yesterday I whipped up the "love" hearts in this picture so I would have something appropriate to post today, and to add a few more hearts to my 365 sewn hearts total.  As I was making them, I realized I had a sewing tip I would like to share with you.

I used red thread to sew the felt letters onto the fabric hearts on the sewing machine (I wanted to hand-embroider around the edges but I ran out of time).  Normally when you sew on the machine, you backstitch at the beginning and end of your line of stitching to secure the thread.  I didn't want backstitches to detract from my red outline, so here's what I did:

I stitched all around the letter without backstitching, and I left a long tail of thread at both the beginning and the end.

Flipping the heart over, I pulled the loose threads from the front through to the back (with the help of a pin).

Then I just tied them in a knot to secure the threads.

There--a nice neat outline!

I happened to have some  red polymer clay beads that I made a while ago and never used--they were perfect to put between my hearts!  Then I used a long doll-making needle to string everything onto a length of embroidery floss.  This is the hutch in my dining room; I think the little "love" garland fits in very well.  (The strange glow in the lower right is the reflection of my computer screen from the other side of the room!)


Have a happy Valentine's Day, everyone!

Wednesday, February 8, 2012

One White Bag

Regular readers of this blog will remember my customer (a friend of my mother in Arkansas) who ordered some special bags back in the fall.  First there was the all-black bag

which was followed by the all-brown bag

which has now been followed by the all-white bag!  The light-weight cotton fabric on the front came with the pin-tucks and lace sewn on already.  The back and inside are canvas.

I'm sure you're thinking "how will she keep it clean?"  The answer is, she will throw it in the washing machine frequently!

I know that because this is actually the SECOND all-white bag she has ordered from me; the first one has lasted through several summers and many trips through the washing machine!  I Scotch-Guarded this one and sent it on it's way to her last week.
Although I prefer the freedom of sewing whatever I feel like making for my booth at Country Treasures, these unusual special orders force me to think in new ways about the things I make.  Lessons I learn from special orders always transfer over to my daily sewing, adding to both my experience and creativity--so bring it on!

Friday, December 9, 2011

Wintery Blue Bags

Now that we are well into December, my crafting has shifted from Christmas-themed to a more general winter theme.  Coincidentally, I had some special orders this week for purses that are blue and winter-themed. 

Lee Ann, a regular customer of mine for many years, LOVES bears and teddy bears, so when she called to ask for something wintery that would go with blue jeans, this is the first fabric I thought of, since it has bears on it.  It has a wonderful back-woods, log-cabin feel to me.

But I wanted to give her more than one choice, so I made this bag too.  The fabric has different stripes of wintery scenes:  snow-covered houses, bare trees, and big silver and white snowflakes.

At the same time I was making these two bags, another regular customer, Debbie, called to ask for snowflake bags for herself and her daughter (Debbie ordered the Christmas bag and school-themed bag I showed you a couple of weeks ago).

I made these two bags for Debbie and her daughter, and then showed all three pictures to Lee Ann.

Much to my surprise, she chose the second bag with the bare winter trees!  It really is a great fabric, with touches of metallic silver sparkling all over it.

Just as I sat down to write this post, Debbie called to say her daughter had just picked up the two snowflake bags (I had left them for her at the local store that carries my crafts) and they both LOVE them!  She said they plan to get bags for every holiday and season!  That means I need to start looking for some great Valentine's Day fabric!!