Wednesday, May 30, 2012

iPad Sleeve Tutorial

Today I am sharing another one of the tutorials I created for the Bernina Master Craftsters campaign on Craftster.   I was purposely focusing on some of the features of the Bernina 380 that I had on loan, so some of the directions are specific to that sewing machine, but I'm sure you can easily adapt it for the machine you happen to have.  If you don't want to make the buttonhole, just skip it and use Velcro on the tab instead.

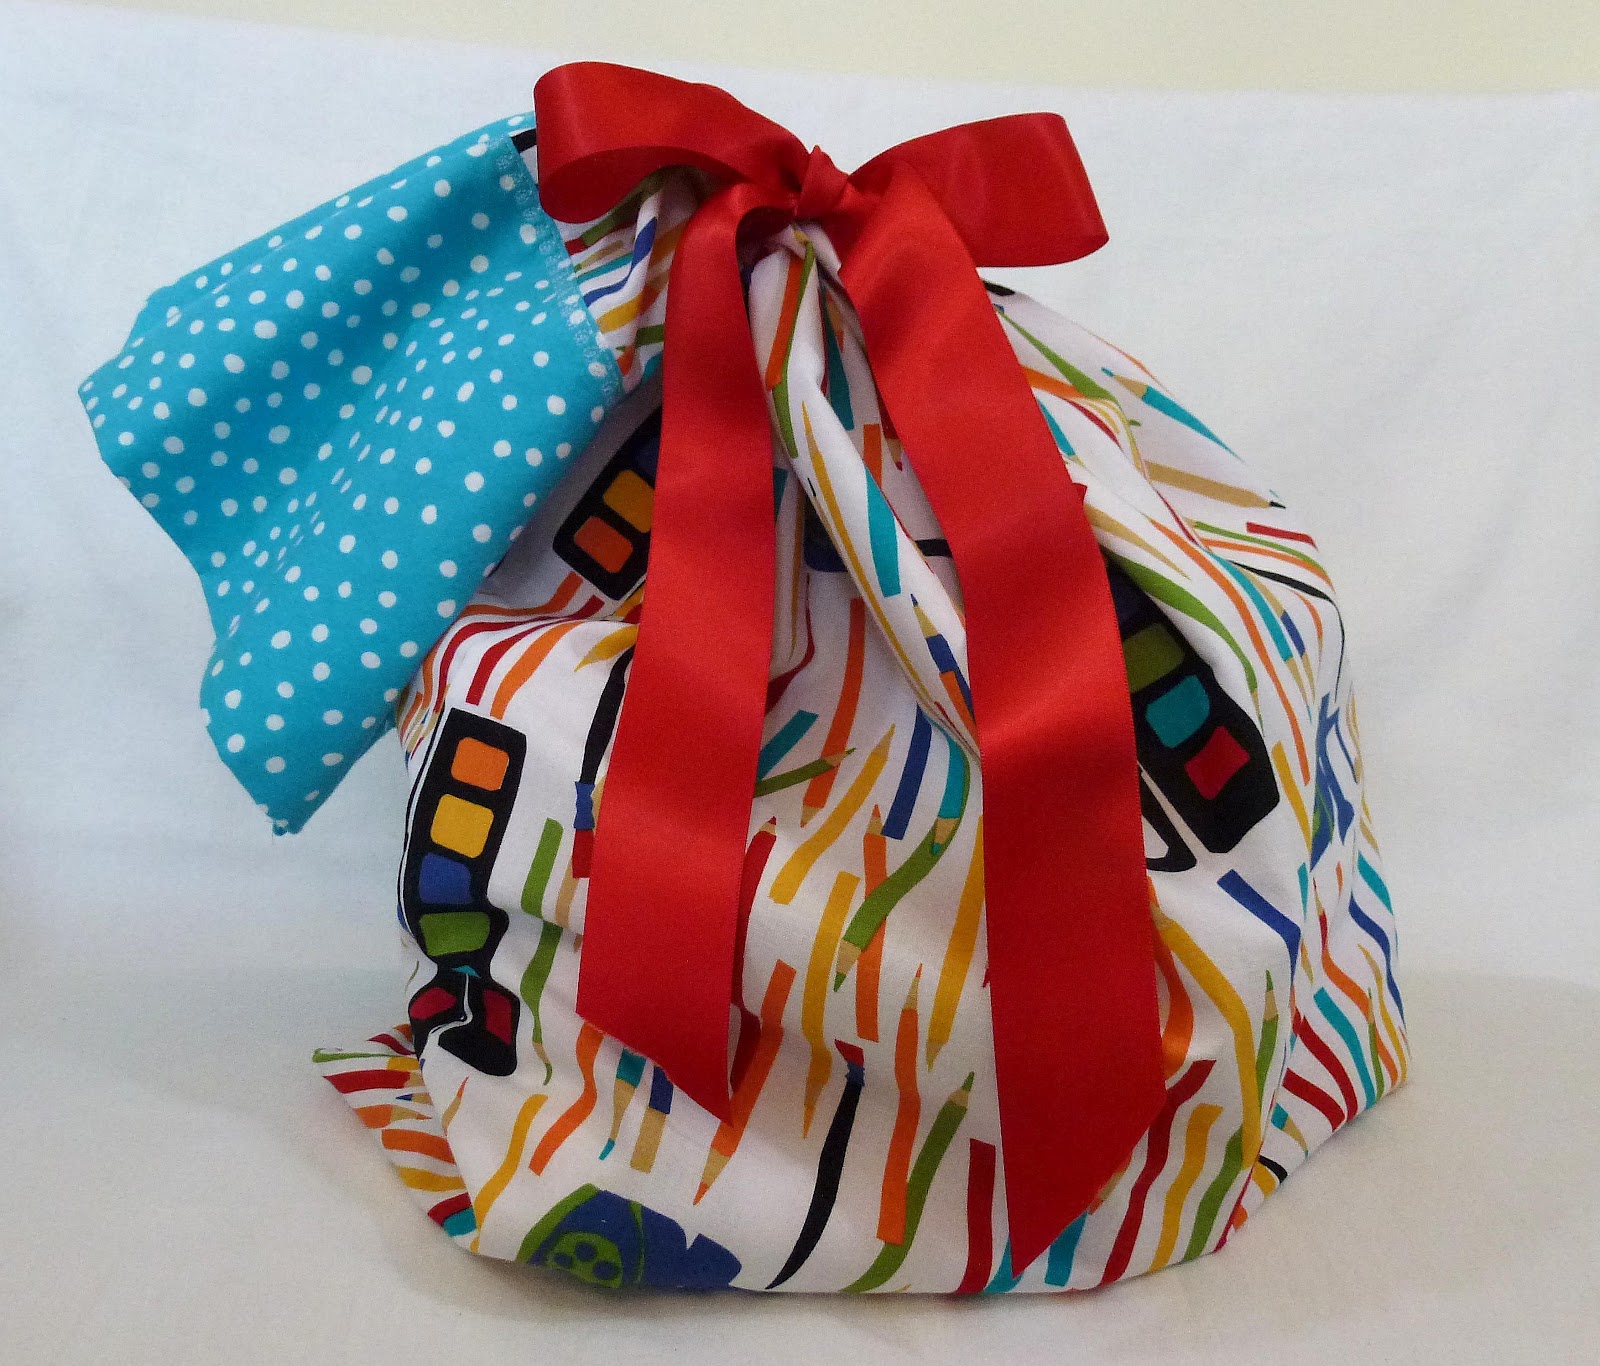
This sleeve accomodates my iPad 2, with the smart cover, with room to spare--which is perfect, because there is a big pocket on the front where I stow a stylus, pen and pencil, and a notebook.  Everything fits just right!

Button-Down iPad Sleeve using the BERNINA 380


You might be shocked to hear this, but in all my years of sewing, I've never made a buttonhole on a sewing machine...until today! I expected it to be hard to master, but I discovered that making a buttonhole on the BERNINA 380 isn't just easy, it is RIDICULOUSLY EASY!!


I decided to make a sleeve for my iPad that closes with a button-down flap. I started the flap by cutting a piece of striped fabric approximately 5" x 6". I added two layers of iron-on interfacing to it so the flap would be nice and firm. To make a template for the curve at the end of the flap, I folded a piece of paper, measuring 4" x 2", in half lengthwise, and rounded the end. Then I trace it once onto the interfacing, near the edge, leaving a 1/4" seam allowance. I folded the fabric in half, right sides together, and then sewed on my drawn line.


I used presser foot #20, the embroidery foot, because the front of the foot is completely open, making it easy to sew exactly on the line I had drawn. After sewing the entire line, I trimmed away excess fabric, turned the flap right-side-out, pressed it, and topstitched 1/4" from the edge all the way around.


Now for the exciting part: the buttonhole!! The BERNINA 380 has numbered buttons with pictures of the stitches above them. I pressed "0", which the machine calls "10", as you can see in the picture below. It also tells me to use foot #3 (which has a big buttonhole attachment, it's a few pictures down...we'll get to it!)


There's one more thing to do to prepare for a buttonhole: when loading the bobbin, you have to run the thread through this little eye in the bobbin case. It adds a little more tension and makes for a prettier buttonhole!


Next, position your button on your fabric, and make a small mark at the top and bottom of the button.


Position the fabric so that the top mark is directly under the needle. (Here's the buttonhole foot I mentioned earlier!) Now all you do is step on the pedal and sew down to the second mark you made on the fabric. Stop, and press the "quick reverse" button one time. That tells the machine the length of your buttonhole. Now just step on the pedal and watch as the machine sews the other side and the top and bottom tacks of the buttonhole. Cool!!


It was easy to use an X-Acto knife to cut the buttonhole open.


Perfect fit! I love it!! I'm going to use buttonholes on everything from now on! But first, let's finish this iPad sleeve!


All seams are 1/4", unless otherwise specified.

For the outside front and back, cut 2 green pieces 8" x 9 1/2", and two striped pieces 4" x 9 1/2". Sew one striped piece to the top (9 1/2") side of each green piece; these finished outer pieces will measure 11 1/2" x 9 1/2". Press, and apply iron-on batting, cut slightly smaller than the finished outside pieces.

If you want to make a pocket on the front like I did, cut two pieces of the green fabric 8" x 9 1/2". Apply fusible interfacing to both pieces, then sew the top seam ONLY, right-sides together. Turn right-side-out, press, and top stitch 1/4" away from the top edge.

For the lining, cut two pieces of the striped fabric 11 1/4" x 9 1/2" (yes, the lining is slightly shorter than the outside, to make a better fit). I love to use interfacing, so I applied light-weight fusible interfacing to both lining pieces.

To assemble the sleeve, start by machine-basting the pocket onto the lower edge of the front piece, and machine-baste the buttonhole flap onto top center of the back piece.


Now, layer one piece of lining on top of each outer piece. Sew the piece together along the top edge ONLY. Flip the lining up, and press the seam flat. Your fabrics should now look like the picture below. The front is on the left, the back is on the right.


Now flip the back section onto the top section, right sides together, and pin them together. Sew all around all four sides, leaving a 4" section unsewn in the bottom of the lining, for turning. After sewing, trim off excess fabric from the corners, and turn the sleeve right-side-out.


Fold in the raw edges of the opening and press. Sew the opening closed, very close to the edge of the fabric.


Now just push the lining into the sleeve and smooth it out. Press the whole thing well, then top-stitch 1/4" from the edge. Sew on your button, and you are DONE!! Great job!


Monday, May 28, 2012

Storage Jar Labels with Tutorial

Here's another one of the projects I made for the Master Craftsters campaign on Craftster.  The very last picture shows the wonderful new cubbyhole shelf I had just gotten from The Pottery Barn--I had seen it in the background of someone's post on Craftster, and I HAD TO HAVE IT!!  I ordered it online, and I just love it to pieces!  Coincidentally, a month or two prior to that, I had bought a case of canning jars at the grocery store with the intention of filling them with goodies to add to swap packages; but when I tried it out, the relatively small size of the jars, combined with their weight, made them a poor choice for a fun extra in a swap package, so I scrapped that idea and they were just sitting on the floor of my living room, taking up space.  As soon as I had the shelf set up in my sewing room, the lightbulb came on over my head:  Canning jars would fit in the cubbies!--The jars needed labels!--The Bernina 380 sews words!--I know what my next project will be!!!!

If your sewing machine doesn't sew words, you could make labels similar to this by either hand embroidering onto the felt; or, using cotton fabric or linen, you could rubber-stamp the words.


Storage Jar Labels using the BERNINA 380


I have a new cubby-hole shelf in my sewing room, and I'm using pint-size canning jars for storage there. I wanted some labels for the jars, and the BERNINA 380 just happens to be able to sew letters and words--this is a perfect project to experiment with that!


For 12 jars with a 10" circumference, you need 12 fabric strips cut 1 1/2" x 11", 12 pieces of 1/4" wide elastic cut 10" long, and wool felt in two colors.


Start by making the straps to hold the labels in place: using a 1/4" seam, sew the fabric strips in half lengthwise, right sides together, then turn them right-side-out. Thread one piece of elastic through each fabric tube. (I used the turning tool in the picture above to do both.) Then overlap the ends of the elastic 1/2" and sew the overlapped area securely on the machine.


You don't have to finish the ends of the fabric, since they will be covered by the label.


Now it's time to make the label! The manual for the BERNINA 380 gives easy-to-follow instructions for selecting the letters you want to sew. You scroll through the alphabet and make your selection. 


Then you step on the pedal and the machine sews the word! It's so cool!


I sewed my words onto white wool felt, leaving spaces in between for cutting.


Carefully cut the words apart, leaving 1/4" of the felt on each side. Then, cut along each edge with pinking shears.


Measure and cut the gray felt 1/4" wider and longer than the white felt. Pin the word to the gray felt, and sew it on the BERNINA.


Beautiful!


Cut a second piece of gray felt (for backing) the same size as the one on the label, and layer a strap between the backing and the label. Pin them together and sew close to the edge of the gray felt, all the way around all four sides with the machine.


This is how the finished labels look, front and back.


Slip a label onto each jar and you are done!


Here are my jars, all neatly labeled. This was a fast and fun and practical project--I love it!

Saturday, May 26, 2012

Fun Pillowcase Tutorial

This is another of the projects I made for the Bernina Master Craftsters campaign I was involved in on Craftster.  I started making pillowcases last year for my daughter (she loves them and can't get enough!)  They are fairly quick and easy to make, so I'm always on the lookout for fabrics she might like.  I made this one with her in mind--she is an art student, so the colored pencils and paint boxes were perfect for her!  I actually used it as a gift bag for her other birthday gifts this year:


Here's the tutorial--enjoy!!

Fun Pillowcase using the BERNINA 380


A pillowcase made of special fabrics can be a great gift, especially for kids and teenagers. Who cares if it doesn't match the sheets? Pillowcases are fun!

I made this pillowcase with French seams and a double layer of the blue fabric, so all the seams are enclosed, and it has a nice substantial feel.


Here's how to make it: start by washing and ironing your fabric. Then, cut two pieces of the main fabric 24" x 21", and two pieces of the contrast fabric 13" x 21". Using a 1/4" seam, sew one piece of contrast fabric onto one end of each of the main fabric pieces, as in the picture above.


Next, iron under about 1/4" of the contrast fabric, then fold it down to cover the seam, as in the picture above. Pin the fabric in place over the seam, and iron the top edge of the contrast fabric.


At this point you could just sew a straight stitch near the lower edge of the contrast fabric to hold it in place, but I wanted to try out a decorative stitch on my BERNINA 380. I had 115 stitches to choose from!! After much deliberation, I finally decided on number 79, a row of hearts; I entered the stitch into the machine, and you can see the number on the display in the picture above.


Once the number was displayed on the screen, all I had to do was step on the pedal and guide the fabric. Easy!


The row of hearts looks equally good on the front and the back of the fabric (that's the front on the left, and the back on the right.) Next time I will use a different thread color so there is more contrast.


Now, to sew the French seams, layer the two pieces of the pillowcase WRONG sides together. (It seems so wrong, but it is so right!!) Using a 1/4" seam allowance, sew around the three raw edges of the pillowcase.


Then turn the pillowcase inside out and press the seams flat. Using a 3/8" seam, sew along the three sides you just sewed. This will enclose your seams.


Turn the pillowcase right-side out and press. Ta-da! It looks so professional! It's ready for gift-giving!


Thursday, May 24, 2012

Vintage Nursery Style

Recently I showed you the sewing basket I made for one of my partners in the Sewing Accessories Swap on Craftster; today I have pictures of the package I put together for my other partner, adrienne_bowers.  Adrienne has a unique personal style:  she LOVES all things vintage, and she sells them on etsy too.  One of her favorite color combinations is light pink and light blue, and she loves vintage nursery-style things.  I decided that the best way for me to pull this all together was with something embroidered, so I looked online and found a TON of free vintage embroidery patterns--I had no idea there would be so much to choose from!  Two of Adrienne's favorite motifs are lambs and deer, so I grabbed a couple of those patterns and started working.

How sweet is this "Little Lamb"!  I embroidered it on bleached muslin, then hand-sewed it onto the fabric I had already cut out for a fabric basket (but for this swap, I'm calling it a sewing basket!)  I didn't have any vintage fabric, but this blue seemed just the right shade.


You can see the lining of the basket below.  Again, it isn't a vintage fabric, but the colors were just right, so I went with it!


I love this cute little deer!  I did this the same way as the lamb, by first embroidering it onto bleached muslin, then sewing it onto the fabric I had already cut to the size to use for this needlebook.


Since it's a sewing accessories swap, I wanted to add a pin cushion of some kind, and this tie-on pincushion was the perfect thing to go on the sewing basket.  It is made of wool felt.


Then I went on a mini shopping spree and gathered a bunch of color-coordinated sewing notions to fill up the basket.


Here's the message I got from Adrienne when she received this package: 
      "I just got a chance to unwrap your package and I am completely stunned by how absolutely beautiful and thoughtful everything was! That basket and needlebook are so professional and perfect! And the colors!   Blue and pink--my favorites! Thank you SO much, and I hope my package gives you even half the heart flutters yours gave ME!"

I think she likes it!!  Yay!

Tuesday, May 22, 2012

Happy Cloud: Tutorial and Giveaway

How cute is this happy little cloud?!  This is one of my favorite projects that I made for the Master Craftsters series on Craftster.  The cloud is on the front of a reusable notebook cover, an it is very easy to make.  I wrote a tutorial for it that I will share with you below.  If your sewing machine doesn't sew letters, you can add "happy" by hand-embroidering it, or stamping it with rubber letter stamps directly onto the linen.  (You can find I great tutorial about rubber stamping on linen on Lime Riot's blog.)


I made this one, "Notes", for my mom for Mother's Day.  She loved it!


This little bird picture is actually a felt badge like those we swapped on Craftster.  It is made of wool felt and embroidery thread, and is all hand-sewn, except for the outer boarder, where I machine-sewed it to the notebook cover.


One thing I quickly realized is that when choosing a fabric for the cover, it has to be fairly plain, or it will detract from the felt badge.  That's why the cloud is on natural linen, and the bird is on a narrow, light-colored stripe.


Regular readers will know that I have recently started a new craft:  hand-carving rubber stamps.  I had the idea to make a stamp of the happy cloud, and then I had to think of something to use it for...and I remembered that I recently posted about my button-making machine, and I showed you the pin-back buttons I made to take with me to the Craft Gossip Fork and Talk event last month...and I mentioned the possibility of a button giveaway...and it all came together for me in the form of these uber-cute buttons, which I want to give away!!


I stamped the cloud onto white paper, then added the word "happy" (some I wrote by hand, others I stamped with a set of alphabet rubber stamps) and then added the blue color with a Copic marker.


If you are a follower of my blog, and would like to have one of these happy clouds appear in your mailbox, just do two little things (you can become a follower by clicking on the "Join this site" button on the right):

1.  Leave a comment at the end of this blog post. (I live for your comments!)
2.  Send me an e-mail (leslieandersen4@gmail.com) with your name and mailing address.  Even if you have sent me your mailing address before for another giveaway, please send it again, just in case it has mysteriously disappeared from my well-organized filing system.

This giveaway may close unexpectedly if I become overwhelmed with making buttons!

Now, here's the tutorial I promised:


Happy Cloud Reusable Notebook Cover Tutorial
I needed a small gift for a friend, something that was cute and easy to mail. After MUCH thought, the lightbulb came on over my head, and I whipped up this cute little notebook cover! I will send a couple of refill notebooks with it, so she can switch the cover to a fresh book when the first one is full.


I started with one of these Moleskine notebooks, in the 3 1/2" x 5 1/2" size. Moleskine notebooks are really good quality, which enhances my gift!


I opened the covers and traced the outline onto cardstock, then added 1/8" to the width and length (so the cover will have a little wiggle room to ease it onto the notebook) and then traced the cardstock shape onto a piece of linen. This will be the front of the cover.


Next, I prepared the decorations for the front. I have used the alphabet program on the BERNINA 380 in another project, but this machine has TWO alphabet fonts, and I wanted to try the second one, which produces larger, outlined letters.


I programmed the words "happy" and "notes" into the BERNINA, then stepped on the pedal and watched as the machine sewed them onto pieces of white felt. I really like the way these words look! I will save "notes" to use later.


I trimmed the felt so there was a 1/4" margin around the words, then used the pinking shears to give them a decorative edge.


I sewed the word "happy" onto a piece of dark blue felt, cut just a little larger than the white felt.


I'm not including a pattern for the cloud, because I know you can draw a cloud! I cut out my cloud drawing and traced around it onto white felt. Then I stitched the eyes (French knots) and the mouth with black embroidery thread.


I cut out two ovals of different shades of blue felt, and stitched them together as you see in the picture. The BERNINA 380 can sew through several layers of thick canvas, so these three layers of felt were a piece of cake for this awesome machine!


I wanted to center my cloud and word decorations on the front of the cover, but my sewing line (which I wanted to use as a guide) was traced onto the BACK of the front cover; so I marked the four sides with pins and flipped it over. Using the pins as a guide, I centered the decorations, pinned them down and sewed them in place.


To finish the cover, I trimmed the cover fabric so there was 1/4" seam allowance all around. Then I cut two pieces of linen for the flaps (which hold the cover onto the notebook) 6" x 6", folded them in half, and laid one along each outer edge of the front cover, with the fold toward the middle, as in the picture below.


On top of that I placed a piece of linen (for the lining), cut 1/2" larger than the cover fabric, and pinned them all together.


I sewed all around the edges, leaving an opening at the bottom. I trimmed the excess fabric, and turned it right-side-out with the help of a pair of hemostats. I pressed the cover, topstitched the opening closed, and I was done!


To get the cover onto the notebook, it's easiest to bend the book covers back like in the picture below.


This is so cute, I can't wait to try a few more!