Pages

Wednesday, September 28, 2011

Box of Hearts


Here are the hearts I promised to show you, from my personal swap with Jo S. on Craftster.  If you haven't checked out Craftster yet, please do!  If you create a Craftster account, come back here and leave a comment including your Craftster user name, and I will send you a handmade gift!  No strings attached--no kidding!! (I will send you a private message on Craftster to get your mailing address; so when you see a message from Leslieshappyheart, you will know it's me!)

Our swap was to fill a small flat rate box with hearts.  This is how the box looked before I closed it up.  Jo's favorite colors are turquoisy-blue, limey-green, and red, so I made a lot of the hearts in those colors.


This is the one that was in-progress in the previous post.  I love how crazy-cute it is!


These two embroidered hearts are based on items Jo has in her Pinterest.  (If you don't have a Pinterest account, you really should give it a try--it is a great place to pull together pictures of everything you like in the world.  Wouldn't your husband--boyfriend--mother--sister--want to see pictures of what you are wishing for when gift-giving occasions roll around?)  Both hearts are cotton embroidery thread on linen.  The bird heart has a green silk back, and the flower heart has a red silk back.  The filling is polyester fiberfil.


These three hearts are all made of wool felt.  The green one is beaded the same on the front and the back; the back of the blue one has small blue beads; and the red one has a combination of embroidered stars and sewn beads on both front and back.  I love all of these, but the flower is my favorite!


The two larger hearts in this picture are obviously made of the same fabric.  The colors are so perfect for Jo that I had to use it twice!  The smaller heart is wool felt with sewn beads and a button on the front only.


These three are the "weird" ones in the bunch!  I talked about the perler bead hearts in a previous post.  The blue heart didn't come out as great as I had hoped; Jo has several Virgin Mary related things in her Pinterest, so I sewed a Miraculous Medal onto the blue heart and covered it with white netting, hoping for an etherial feeling...hmmm, it isn't quite there somehow...


These three are more my colors and style--I like these bright colors, the pink especially!


I believe I just mentioned that I like pink...need I say more?


These are my favorite three. (The button heart gets another picture!)  The big "S" heart was inspired by several things on Jo's Pinterest that had her initial on them.  The S is made of wool felt, machine sewn onto the fabric.  The small heart with the BIG flower is perhaps my favorite of all of them.  It is all wool felt, and it is small enought that it could be worn as a brooch.  (Good idea, I may have to make some more...)


That's the end of my show-and-tell about the box of hearts.  I made twenty hearts.  When I proposed the swap to Jo, I couldn't think of more that a few right off the top of my head, but as I continued to think about it and work on the hearts, more ideas occured to me, until I filled the whole box.  I have found that this is how it usually is with swaps:  I start with a small idea that grows and develops as I spend time and effort working on it, and the end result is almost always bigger and better than I could have imagined at the beginning.  That's why swapping is such a great activity--it makes you grow as a crafter.

Next week I will prove this to you by showing you the "Mystery Critter" I just mailed to another swapper today.  I never thought I would make what I made!!

Saturday, September 17, 2011

Crafty Surprise for Cat Owners

I have four cats, so I buy a lot of cat litter!  Recently my favorite brand, Tidy Cats, re-did their large tub, and when they did, they included a free gift for crafters!  Here's a picture of the tub; do you see the freebie?


Yes, it's the lid!  It lifts right off and it's the perfect size and shape to use when crafting something with lots of little parts.  The trays stack together, so when they are empty they are easy to store; I frequently use them to corral the pieces of different on-going projects on my sewing table.  They have a raised edge and a shallow trough around the inside edge, which is perfect for buttons or beads.  They even come in a few different colors!

The button-y heart in this picture is one of the 20 hearts I have made and will be sending soon to Jo S. as part of a personal swap on Craftster.  In a few days I will show you all the hearts I made for her (after I mail them--I don't want to spoil the surprise!)

Friday, September 16, 2011

Perler Beads are FUN!

Thank you, Susan, for leaving a comment on the previous post about perler beads.  That was all the motivation I needed to rip open some packages and start creating!  I decided to make a heart with the letter "S" in it, to include in my Craftster personal swap with Jo S.  We are swapping a small flat-rate box full of hearts, and so far all mine are made of fabric.  A perler bead heart would be a great addition to that!  At Craft Gossip's Fork and Talk on Saturday I received the supplies pictured below:  a huge pegboard, where you create your design; a book of patterns (place the book under the clear pegboard and add corresponding-colored beads to the pegs), and a bag of perler beads.  (There was another big kit of beads and pegboard shapes to make an underwater scene, but I didn't open it for this project).


The small package of beads has 1000 pieces, which I thought was more than enough for my first attempt, although I quickly realized two things:  there are so many different colors in the bag that you probably don't get more than 50 of any one color, and it takes more than 50 beads to make just about anything!  So instead of using all one shade of green for the outside of my heart, I mixed up several shades.  I think it looks batter that way, actually!  See my finished heart below. 

When you have finished your beaded design, you cover it with paper (included in the pegboard package) and iron it on medium for 10-20 seconds to fuse the beads, then let them cool a bit, flip the beads over, and iron again to fuse the other side.  I was afraid my beads wouldn't fuse and I would lose my design, so I ironed for about a minute, then cranked up my iron to high for the second side!  I think I overdid it!  It will take some practice to get it just right.  I tried a second, smaller heart, and I REALLY ironed it--I liked the way the holes disappeared the more I ironed, and it started to have a patchwork-quilte look.  When I look at the pictures provided with the supplies, though, I see that "officially" the holes are supposed to show.  That's probably a good idea, because I can see how over-ironing the beads could get messy, and I wouldn't want to melt my pegboard!

You can also buy shaped pegboards.  The pegs on those boards are arranged to compliment the item you are making, so my hearts, for example, would have turned out more rounded and less pixelated-looking with a heart-shaped pegboard.  Go to http://www.perlerbeads.com/  for more information.

Thank you to EK Success Brands for the supplies I used for this project.  It was fun!  At Susan's suggestion I looked online and discovered all kinds of amazing people doing amazing things with perler beads.  I want to try turning them into hair clips, key chains and brooches.

Wednesday, September 14, 2011

Fork and Talk Part 2--The Swag!!

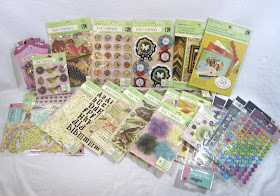
The afternoon at Trio's restaurant in Little Rock-- when I met with 19 other bloggers thanks to Craft Gossip and EK Success Brands--was awesome all by itself, but it got EVEN BETTER at the end when we all got bags full of crafty goodness!!  There was so much stuff, that it wouldn't all fit in the big yellow backpacks that came with it--one of the editors of Craft Gossip had to run to the grocery store to get paper bags to hold the overflow!  You won't believe everything I got!

Martha Stewart goodies:

Perler beads!  I haven't used those in a while!

Awesomely cute sewn-animal kits; big paper punches for boarders, and scissors (I love scissors!)

Sewing kits for pillows and a wall-hanging; rubber stamps and backing blocks,and stamping ink

Laliberi brand kits for making a lot of different kinds of jewelry, plus a few individual components:

Scrapbooker's heaven!  So many stickers, papers and embellishments!

I have to show you my absolute favorites!  Out of all that wonderful stuff, here are the items that thrilled me the most: 
--racoon-stuffies kit (an American Girl Dolls product--sooo cute!)
--bird ornament kit, also sooo cute!
--Martha Stewart colored pens
--Cutter Bee scissors (I love scissors, I can't have too many!)
--scrapbooking 3-d bird embellishments
--scrapbooking "buttons" with pretty nature themes
--a cool little notebook with various papers for pages
--Smash Pad themed papers
--the big yellow backpack that most of the things came in, with the EK Success logo on the front.  I love all kinds of bags and I will get a lot of use out of this one!
 In future posts I will tell you more about these products, after I've had a chance to try them out.  If you are curious about any of these products in particular, leave a comment below and I will post about that one first!

Tuesday, September 13, 2011

Fork and Talk--Blogger's Meet-Up

I was recently invited to attend the first-ever Blogger's Meet-Up (also known as Fork and Talk) in Little Rock, Arkansas.  Since that's where my mom lives (I'm in Virginia), I jumped on a plane and flew down there!  The event was hosted by the website Craft Gossip, and sponsored by SK Success Brands.  I have much to tell and many pictures to share, so it will take two posts to covers just the basics!  Today I will tell you about the meeting itself; tomorrow I will do a show-and-tell of all the take-home goodies I received.  In the weeks to come I will highlight individual products that I received.

There were 20 bloggers there, all from Arkansas except me!  We were joined by 4 editors from Craft Gossip, who all live in Little Rock.  We met in a private dining room at the wonderful Trio's restaurant. While we waited for our lunch. we went around the room and introduced ourselves. It was great to hear all the different ways these women are creative--the different things they make, and the different ways they share their creations with the world.

I managed to plug our upcoming Journal Cover swap at Craftster.org when it was my turn to speak!!


Our lunch menu:

I had the Leilani.  I had eaten half the sandwich before I remembered to take a picture--it was so good!!

A view of the beautiful dining room:
 While we ate, we chatted and got to know the others at our tables.  After lunch we had a group activity:  each table decorated a hat!  There were four tables, and when the hats were judged...my table was the winner!! Each of us at the table received a craft kit for winning! (Our winning hat is on the far left.)

Then it was time for the indivdual project.  We each were given this flower-making kit by Laliberi.  It contained supplies to create 10 flowers.  We had time to make one at the meeting.  They can be used as a brooch or hair clip, and all the necessary parts were included in the kit.

It was a great afternoon of talking, eating, meeting and crafting!  Before we left, we all received a HUGE bag of crafting goodies supplied by the sponsor, SK Success Brands.  Tomorrow I will show you everything I got!

Monday, September 12, 2011

Pay It Forward

I am just back from my exciting weekend in Little Rock, Arkansas, where I attended the first-ever bloggers meet-up hosted by Craft Gossip and sponsored by SK Success Brands...and I have a LOT of blogging to do regarding that!

But first I have to tell you that I want to give several of you a gift, made by me!  I have agreed to participate in a "Pay it Forward" game, and here are the details that I found on 25 Reasons:

wanna play?

How it Works:

1. I will make a little something for the first 3 people who comment on this post.  It will be a surprise, and it will come to you within the next 365 days (but probably much sooner than that).

2. To sign up to receive a gift from me you must play along too.  Share the giving love on your blog by promising to send a handmade goodie to the first three people who comment on your blog post.

3. You must have a blog.  (But I feel bad about that, so I promise to have another giveaway sometime soon that will be open to everyone.)

4. After commenting on my post, you have to post this (or similar) on your blog to spread the love.

There is a flickr group where you can post pictures of what you receive.  Click here to join .

When you leave your comment, make sure there is a link to your blog you if you are one of the first three.  I will check your blog within the next few days, and if you have posted this, the freebie is yours!  If you haven't posted about it...I guess it will go to the next person who commented!

I love the whole idea of "pay it forward", and I encourage all who read this to find a way to do some small kindness for someone, with no expectation of repayment, in the hope that they will do the same for someone else when they can.

Tuesday, September 6, 2011

Mystery Critters, a Pattern, and a Tutorial

So, I was working in my sewing room the other day when these little critters wandered past my window.

"How strange!" I thought. "They don't seem to have any details or faces!  What kind of critters are they?" I went outside to take a closer look.  They followed me inside and have been hanging around for days now.  I think they want me to make them look normal-- like the other stuffies in my house:

 I hardly know where to begin...so I'm hoping you and a bunch of other crafters on Craftster.org can help me out.  Let's do a swap (you didn't see that coming, did you?!) where everyone crafts their own version of these critters; then I will have a better idea what to do to these three. 

I managed to trace around one of them--it was so squirmy!--and here's the pattern for you to follow when you make your own.  Just print it out, and use that amazing imagination of yours to bring it to life.


(I know you will respect my ownership of this pattern, by not selling it or anything you make from it...thank you!!)


TUTORIAL

This is a simple tutorial that applies to any type of stuffie.  I'm showing how I make my stuffies; if you want to do it differently, go for it!

I like to use iron-on interfacing if my fabric is regular quilting-weight cotton. Why? It gives the fabric a sturdier feel, the fiberfill won't migrate through the fabric, and the finished stuffie won't be lumpy. For heavier fabrics (like fleece, or drapery or upholstery fabric) it isn't needed. 

I use Pellon featherweight, which you can buy by the yard at JoAnn's or Hancocks.  Here is my interfacing and fabric:


1.  Print out the critter pattern and cut it out on the line.  It should measure about 9" tall and 7 1/2" wide. 
This picture shows my fabric with the interfacing ironed onto the back.  (The blue critter is there to remind you where this tutorial is going!)

2.  If you want to use interfacing, iron it onto the back of your fabric.  Trace the critter outline onto the interfacing (or directly onto the fabric).

2.  Cut out the critter 1/4" beyond the line you drew.  (It doesn't have to be exact, because you will sew right on the line; that will be your guide.)

3.  Sew on the face, and any other features you wish to add.  This is where you can get very creative! (Since the critter is a mystery, I don't want to show you one completely finished, so I only put eyes on this one.)

4.  Pin the two sides of the body, right sides together. (I don't bother to draw the outline on the fabric that will be the back, or trim the back into shape, since I will just follow the line on the front and trim it later.)

5.  Sew on the drawn line all around the critter, leaving the top of the head open (be sure to back stitch at the beginning and end of your sewing).  Use a very short stitch on your sewing machine so your curves will be nice and smooth.

6.  Trim away the excess fabric, leaving just 1/4" all around.  Clip the fabric almost to the stitches on the inward curves, like the one I'm pointing to in the picture. (If you don't, your critter will become horribly deformed when you turn it right-side out!!)

7.  Speaking of turning it right-side out...go ahead and do that!  The tool in the picture is a pair of hemostats, which makes turning it so much easier. I like to use a knitting needle or chopstick to really push out all the arms, legs and ears after it is turned.  Stuff it with polyester fiberfill through the opening in the head, then hand-sew the opening closed.  Knead the critter a bit to evenly distribute the stuffing, and you are done!

This critter REALLY looks unfinished...I must insist that you give yours more features than I gave mine!  Try thinking beyond just eyes, nose and mouth...

I'm looking forward to seeing what you come up with!