Monday, July 30, 2012

Cute Outfit

I didn't intend to sew another outfit for my Blythe doll, Bonnie, so soon; but when I was working on a dog-themed heart for my heart blog, inspiration struck--I had seen dolls with headbands with an ornament of some kind... and a flat heart is an ornament...and I have cute scottie-dog fabric that would be a good doll dress...and I could put a scottie dog on the heart...and it became something I HAD to make, quick!


The dress is made from the same pattern as the one in the previous post.  The pattern includes two pockets, but I decided to make it with just one heart-shaped pocket (I wonder what a dolly would carry in her pocket?  I always have a ChapStick and a tissue in mine!)


To make the scottie shape, I simply took a scrap of the fabric with the dog on it, placed it on the black felt, and cut around it with small, sharp scissors.  I sewed the finished heart onto paw-print ribbon, and voila!  A headband! 


It looks cute, but the ribbon doesn't stay on her head very well, and the paw prints are rubbing off from being handled.  I need to come up with something better the next time I make headgear for Bonnie.

Saturday, July 28, 2012

Meet Bonnie Blythe

I'm excited about something new--it's a doll named Blythe.

I first noticed Blythe dolls on the swaps board on Craftster;  the doll owners were making and swapping clothes and accessories for their Blythes.  The clothes were really CUTE, and the accessories were FUN, and I wanted to make some too!  But first I needed a doll.

Takara, the company that makes Blythe, is in Japan, and they don't distribute the dolls in the U.S.  There is only one reliable Japanese store that sells them online--Junie Moon--but the prices there are pretty high.  The best place for me to get my doll was eBay.  I started watching all the Blythe listings obsessively, and reading all I could about collecting Blythe.  It turns out that there are a lot of fake Blythes on the market (made from inferior materials), so you have to be careful who you buy from.  Within a few days I saw the particular doll I wanted--"Raspberry Sorbet"--offered by a good seller in Hong Kong; and I didn't even have to play the bidding game, since she was offered as a "Buy it Now" purchase.

While waiting impatiently for her arrival, I continued reading about Blythe collecting.  There are Blythe blogs and online Blythe forums, and there is even a big Blythe convention taking place in Texas in August:  Blythecon 2012!  (Maybe I'll go next year?!) 
I also decided on a name for the doll:  Bonnie. 

Earlier this week, the mailman rang my doorbell, and I had to sign for the package.  I expected it to take two weeks or more, but she got here in about a week--wow!  The box was wrapped in brown paper and tied with a string, and it was strangely pristine--I've gotten local packages that look like they've been on a long sea voyage, but this didn't have a mark, dent or crease!  Removing the brown paper revealed a plain brown corrugated cardboard box, and inside that was the prize:


And here she is (below), right out of the box and wearing her full ensemble.

I love the hat, coat and boots she came with; but the shirt and shorts she's wearing needed to be ditched fast.  Time to sew an outfit--yay! 


There are a ton of sewing patterns for Blythe online, most notably at Puchi Collective. That's where I found the pattern for this empire waist dress (below).  This is the first time I've sewn doll clothes since I had a Barbie as a pre-teen!  I chose these fabric colors to compliment Bonnie's hair and eyes.  Did I mention that Blythe dolls have changeable eye colors?  They do!  Each doll has four different sets of eyes, and they change when you pull a string on the back of her head.  I'll get busy sewing something to go with each color to show you in the coming weeks.

You might have noticed that her head is "slightly" large in proportion to her body.  All the more reason to make cute hair accessories for her!  I'm dying to make some pretty headbands and fascinators.  She also needs a bed... and a chair...and a table...and a house... and a...

If anyone reading this is a Blythe owner, I'd love to hear about your girl!  Leave a comment below or send me an email (leslieandersen4@gmail.com).

Thursday, July 26, 2012

Farm Critters

The package I put together for my partner in the Invite Your Partner swap on Craftster was so large, I've blogged about it four times already!  Today is the fifth, and final, installment.

My partner, miknessevie, lives on a farm and they have lots of animals, so there were a lot of farm-animal-themed things on her Wist.  I made these two felt badges for her based on things I saw there.

This little lamb appears in stuffed-animal form on her Wist, but it occurred to me that I could feature just the face and make it into a 3" badge.  The ears crack me up!


I myself am a chicken lover, so when I saw a chicken badge on her Wist, I had to make it! This is based on one that includes a lot of zipper teeth (you can see it HERE ), but I simplified it to suit my own style of working with wool felt.


I THINK that's the last of the felt badges for a while!  (But come to think of it, I have received some wonderful badges in swaps, and I haven't mounted them all yet...when I do, I think I will have to do another post to show you the new display!)

Tuesday, July 24, 2012

Pretty Apron

I sew a lot--every day, really--but I haven't sewn anything using a tissue-paper pattern in a loooong time...until I had a request from my partner in the recent "Invite Your Partner" craft swap on Craftster.  Jen asked for a "pretty" apron, because all of hers are boring and utilitarian.  She gave me a link to a picture of an apron she liked, so when I was in JoAnn's one day I looked through their patterns and found Butterick #B5125, a "See & Sew" pattern with the words "YES! It's EASY!" on the front.  It looked similar to the one Jen likes, so I bought it, and some fabric, and here's what I made:


I like the ruffle at the bottom, and the shape of the neckline gives it a "girly" look. (I also like having a beautiful model available for picture taking--thanks, Jenna!!)

I have to say that I didn't think it was super easy, compared to a lot of things I've sewn, but I'm sure that has to do with the fact that I don't like reading and following directions!  Adding the ties to the top was the tricky part, because that fabric also served as a binding for the side edges, and the directions didn't seem as clear as they could be...but I managed to figure it out.


I had enough fabric left to make these "Stay-Put" kitchen towels that Jen had on her Wist.  Now THIS was an easy project!  I used the tutorial at Pin. Sew. Press.  I bought a four-pack of white kitchen towels at Target, washed them, and sewed three strips of fabric to each, then threaded ribbons through the casings.  They are meant to tie onto the oven door handle, so they are handy but not falling on the floor every time you dry your hands.


Jen is happy with her coordinating apron and towels, and I gained a little experience with tissue-paper patterns.  Win-win!

Sunday, July 22, 2012

Farm Play Mat


I had a wonderful time making this farm play mat for my partner in the latest round of the "Invite Your Partner" craft swap on Craftster.  Jen has four children and another on the way, and she had a picture of a similar play mat posted as a "favorite" on her profile page.  You can see a picture of that play mat by clicking HERE.  Since quilting is my specialty, it was obvious that I had to make this for her!

A bird's-eye view (and a cat's-eye view):


Below, you can see it in-progress.  With a little help from my cat, I randomly pieced together odd-shaped patches of upholstery and drapery fabrics, most of which I got for free, either from a friend (who gave me a sample book) or from the "free remnant" bin at an upholstery shop.  This was the perfect use for them!


I added the pond and stream after the top was together.  I just figured it out as I went along.  I like how the pond turned out, but I am unhappy with the shape of the stream; it should be narrower and more meandering.  Boo.  Next time I make a farm play mat I will remember that!


Of course, a farm has to have animals, and I found a small herd of these wooden cows online.  The brand is "Animalz", and they make a huge variety of creatures...it was hard not to buy them all, but I liked the cows the best.


I machine-quilted the outlines of each of the fields and the water; then I got comfortable in my sewing chair and hand-quilted all the furrows with embroidery thread and great big stitches.

I hand-quilted ripples in the water too.  After binding the quilt, the last thing to do was add some bushes.  They are an assortment of green quilting-weight fabrics, made into yo-yos which I stuffed and hand-sewed in place.


I like this last picture the best...this is how Jen's children will see the quilt.  I can imagine them lying on the floor and inventing little dramas for the cows to act out.  I wish them many hours of happy playtime with their new farm mat!

Friday, July 20, 2012

Berry Bag

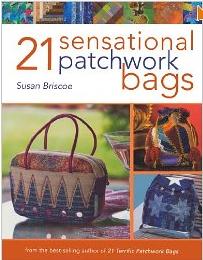
I made a cute little berry bag for a partner in a recent craft swap on Craftster.  She had it on her Wist, and she mentioned it as a big wish in another swap, but it didn't appear that she had received one yet, probably because the pattern isn't available online.  A little research led me to the pattern in this book:


...and because I was in a hurry and didn't want to wait for it to come in the mail, I decided to download "21 Sensational Patchwork Bags" to my iPad.  I wondered how I would copy the patterns, but I threw caution to the wind and went ahead and bought the download.

Just as I suspected, buying the e-version of a pattern book wasn't that great.  I ended up enlarging the patterns (to the size I though was right) on the screen, then placing paper on my iPad and tracing them.  The bag is made of two differnt petal-shaped pieces (one for the berry and one for the leaves), and I was surprised that the "test" bag I made came together perfectly!  The only problem was, I added interfacing (I seem to be addicted to interfacing!) and the bag was too stiff to close properly, so I removed the drawstrings and now I'm using is as a threadcatcher in my sewing area.  I love my "reject" bag!

The berry bag in the book is made of patchwork, but my partner had "Wisted" some that were made in batiks, so I used these beautiful batik fabrics for hers.


Making the little balls for the ends of the cords was trickier than I expected it to be.  It took a LOT of stitching around the tops to get the shape just right.


The bag is really small, about 4" wide and tall.


I used the same fabric for the lining as for the outside, but it would be pretty with a different fabric inside.

My partner loves her berry bag!

Going back to the book for a moment--I highly recommend "21 Sensational Patchwork Bags" if you have any interest in patchwork or bags.  There is a lot of information, and a lot of interesting bags in all sizes and styles.  Just do yourself a favor and buy the PAPER version!

Wednesday, July 18, 2012

My First Prayer Flag

My friend Susan and I have started a new swap on Craftster called the Prayer Flag Swap.  There was a recent article about prayer flags in the magazine Cloth Paper Scissors that we are using for our guide. 

There is a cool blog called The Prayer Flag Project  that is dedicated to these flags if you want to read more on the topic. The original idea is that the prayer flag is a small banner to be hung outdoors, that slowly deteriorates and releases your prayer into the world. With that in mind, you can see that it is not expected to be a masterpiece of perfect stitching. Rather, it is an art piece that is thoughtfully and prayerfully made.

One of the participants in the swap happens to be my partner in another swap, and she suggested that we also exchange prayer flags.  I liked the idea because it would give me a chance to practice before the actual prayer flag swap started!  I decided to make it collage-style, with all the edges left unfinished.  Since my partner has a picture of a field of lavender for her avatar on Craftster, I used that as my inspiration as I gathered fabrics from my stash, and started cutting.  Here is an in-progress shot, before anything was sewn together:


We exchanged some possible words to use on our flags, so I used rubber stamps to write "prosperity".

I used machine-sewing to anchor all the fabric, and then I sewed on buttons and coins by hand.  I am extremely pleased with this first prayer flag!  I love the freedom of cutting and sewing without worrying about finishing the edges.  After this one I made two more, which are currently in transit to my swap partners.  I will show them to you next week.


 If you would like to make a prayer flag yourself, here are the simple instructions:


How to Make Prayer Flags
1. Cut pieces of fabric to 5" x 11". Use materials you already have on hand.

2. Fold the top down on each piece of fabric and stitch in place to create a 3" sleeve, making the flag surface 5" x 8".

3. Paint, stitch, embroider, appliqué, or collage the flags.

4. Add words, journaling, or symbols as desired. You can appliqué letters, add hand stitching, stencil with textile paint, or just write with a permanent marker.

5. Thread the flags onto a string or cord and hang them outdoors so the breeze will catch them and spread your intentions.

It's all up to you as to what surface designs or stitch techniques you want to use on your flag.